

NAVIGATION WITH RECIPE TITLES IN ABC ORDER WITH JUMP LINKS AND HAVE THEM GO DOWN IN ORDER ONE BY ONE
-
Recipe of the Week
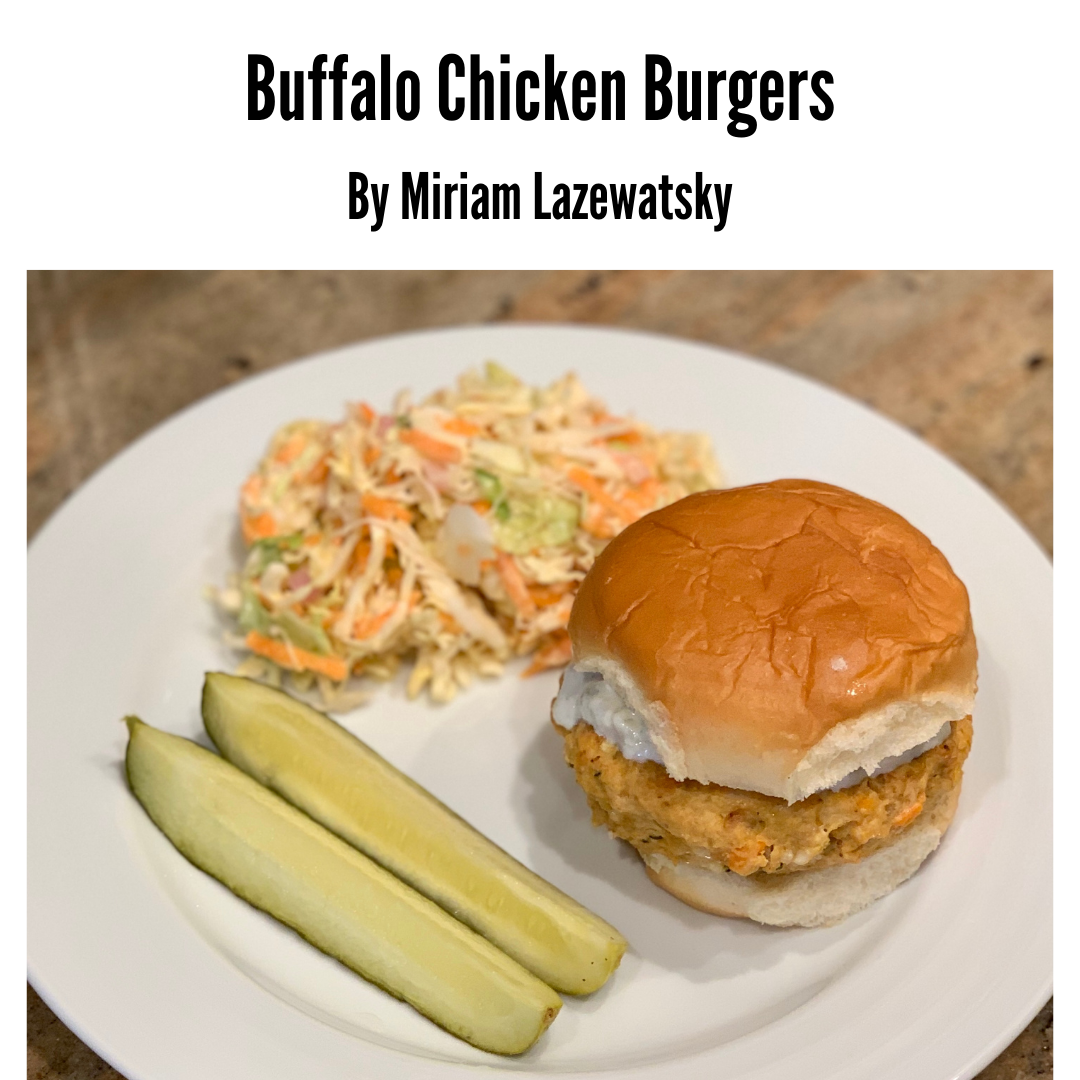
Buffalo Chicken BurgersThis PRS Power Recipe is brought to you by PRS resident foodie Miriam Lazewatsky!
If you make the recipe below please share it on social media using the PRS hashtag (#prorehabstrength) and tag Miriam (@liftsatnight) and PRS (@prorehabstrength) and let us know how you like it!
These buffalo burgers are flavorful and not too spicy, but still have a kick to them. Making the burgers with lean chicken and topping with a Greek yogurt-based dressing means they have plenty of protein with only moderate fat. Plus, this meal is super filling! If you’re gluten free, use a gluten free bun, or skip it altogether and add some French fries on the side.
Buffalo Chicken Burgers with Bleu Cheese Dressing and Coleslaw
Makes 4 servings
Nutrition Information:
Per Burger: 280 calories, 16 fat, 11 carbs, 24 protein
Bleu Cheese dressing: 70 calories, 5 fat, 2 carbs, 6 protein
Coleslaw: 120 calories, 6 fat, 12 carbs, 3 protein
Burger Ingredients:
· 16 oz. ground lean chicken
· ¼ cup chopped red onion
· 1 celery rib, chopped small
· 1 carrot, shredded or chopped small
· 1 tsp parsley, fresh or freeze dried
· 1 egg
· ½ cup bread crumbs (sub panko or gluten free, if needed)
· 1 tsp garlic powder
· ½ tsp sweet paprika
· 1 Tbsp olive oil
· 3 Tbsp hot sauce (I like Frank’s Red Hot)
Bleu Cheese Dressing Ingredients:
· 3 oz. plain non-fat Greek yogurt
· ½ Tbsp Hellman’s olive oil mayonnaise
· ½ Tbsp lemon juice
· ½ Tbsp white wine vinegar
· Pinch of garlic powder
· ½ cup (2 oz.) bleu cheese crumbles
Coleslaw Ingredients:
· 16 oz. bag of shredded green cabbage
· 1 large carrot, shredded
· 1/4 cup (2 oz.) Hellman's olive oil mayonnaise
· 1/4 cup (2 oz.) plain non-fat Greek yogurt
· 1 tablespoons Splenda baking blend (2 Tbsp if using regular sugar)
· 3 tablespoons apple cider vinegar
· 1/2 teaspoon celery seeds
· 1 teaspoon Dijon mustard
· 1 shallot, minced
Directions:
1. For the coleslaw: In a medium bowl, whisk together mayonnaise, Greek yogurt, Splenda baking blend, apple cider vinegar, celery seeds, and mustard. Place cabbage, carrots, and shallots in a large bowl. Pour dressing over the cabbage mixture and mix well. Cover and place in the refrigerator for at least an hour to allow flavors to meld.
2. For the bleu cheese dressing: In a small bowl, mash together the yogurt and bleu cheese. Add the mayonnaise, lemon juice, vinegar, and garlic powder and stir to combine. Set aside.
3. For the burgers: Add all burger ingredients to a large bowl and mix until fully combined. Divide into four equal portions (they should be about 6 oz each) and shape into patties. Heat a skillet over medium heat for 2-3 minutes, then spray with a non-aerosol cooking spray. Cook burgers for about 5-6 minutes per side, or until the center hits 165F.
4. Serve on buns of your choice (not included in macros above); I like King’s Hawaiian. If making for meal prep, keep everything separate until ready to eat. Top burgers with bleu cheese dressing and your choice of toppings, like tomatoes, onions, and lettuce.
-
Recipe of the Week
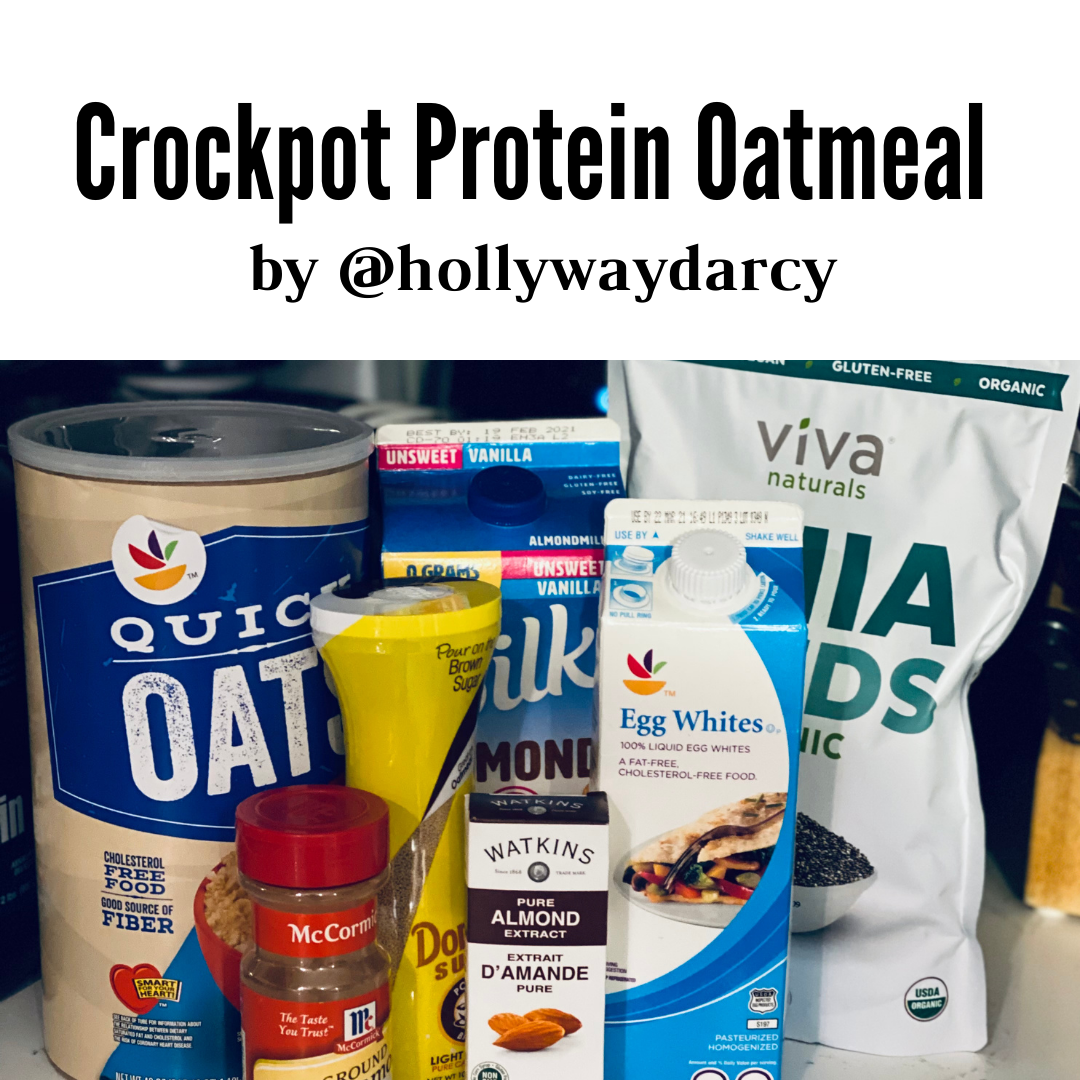
Crockpot Protein OatmealThis PRS Power Recipe is brought to you by Holly D’Arcy! Holly is joining PRS Weekly with a tasty recipe packed with protein and carbs that supports the PRS Approach to training and nutrition - and are a great breakfast or pre-workotut meal!
If you make the recipe below please share it on social media using the PRS hashtag (#prorehabstrength) and tag Holly (@hollywaydarcy) and PRS (@prorehabstrength) and let us know how you like it!
Looking for a nutrient-dense meal that packs a high-performance punch? Here is a protein-dense oatmeal recipe boasting over 25 grams of protein that tastes delicious. This would be a great breakfast or pre-workout meal that will keep you satiated and provide a steady stream of energy for a busy day. Carbohydrates are our body’s preferred source of fuel for resistance training, so I like to partition a large amount of my carbohydrate “budget” around my training sessions. I also like to use a mix of fruit and starchy carbs before I train, and I eat a meal like this one 1-2 hours before I train.
There are options below to make this recipe lower in carbohydrates if desired. This oatmeal would also be great with berries, nuts or nut butter, coconut, etc.
Please note: make sure to use a crockpot liner or grease your crockpot very well before making this recipe! The cooked oatmeal will stick if you don’t. Please enjoy this recipe and let me know what you think of it!
Crockpot Protein Oatmeal
SERVINGS: 4 (about 1 cup each)
PREP TIME: 5-10 minutes
COOK TIME: 2-3 hours
INGREDIENTS
280 grams or 3 ½ cups uncooked old fashioned oats
2 tbsp chia seeds
2 tbsp coconut sugar or brown sugar (sub for granulated stevia to cut carbohydrate content down)
2 tsp cinnamon
Large pinch of salt
½ tsp vanilla or maple extract
625 grams or 2 ¾ cups liquid egg whites
240ml or 1 cup of unsweetened almond milk or milk of choice
2-3 bananas (macros listed are for 70 grams of banana per serving)
DIRECTIONS:
Insert crockpot liner or liberally grease crockpot with butter or non-stick spray.
In a large mixing bowl, mix all ingredients except for bananas.
Pour mixture into crockpot, and cook on low for 2-3 hours.
Scoop one serving into a bowl.
Top with bananas (or any fruit/toppings of choice) and enjoy!
Storing: you may choose to store this on “warm” in your crockpot or refrigerate.
Reheating: cover and microwave for 30-60 seconds.
NUTRITION ESTIMATION (per serving, about 1 cup):
29g protein - 71g carbohydrates - 8g fat - 4g fiber
*This breakdown includes the bananas and brown sugar. Deduct 20g carbs if you use stevia and forego the fruit.
Holly D’Arcy is a personal trainer and online coach specializing in nutrition, lifestyle, and fitness for women. She is a mother of 2 and a military spouse currently located near Ft. Leavenworth where her husband is assigned. You can follow Holly along on her adventures via her website www.hdfitnesscoach.com or Instagram @hollywaydarcy.

-
Recipe of the Week
Potato Cheddar FrittataThis PRS Power Recipe is brought to you by PRS resident foodie Miriam Lazewatsky! Miriam is providing us with a great and tasty recipe that can be eaten any time of the day, and just so happens to be vegetarian and gluten-free!
If you make the recipe below please share it on social media using the PRS hashtag (#prorehabstrength) and tag Miriam (@liftsatnight) and PRS (@prorehabstrength) and let us know how you like it!
Baked frittatas are one of my favorite multipurpose meal preps. They work for breakfast, lunch, or dinner and reheat well. They also pair perfectly with a salad or soup to add more vegetables. Plus, potatoes and cheese are always super tasty and are perfect with eggs. While I don’t have any dietary restrictions, this recipe happens to be both vegetarian and gluten-free while also providing plenty of protein.
Potato Cheddar Frittata
Makes 4 servings
Nutrition Information: 240 calories, 10 grams fat, 16 grams carbs, 22 grams protein
Ingredients:
· 2 medium russet potatoes (approx. 10-11 oz. total)
· 1 small yellow onion
· 1 Tbsp. olive oil, divided
· 1 small container (460 grams) egg whites
· 1 whole large egg
· 2 Tbsp. half and half
· 3 oz. Sargento 2% 4 Cheese Mexican Blend, shredded
· ½ tsp. salt (or to taste)
Directions:
1. Preheat oven to 375° F. Spray an 8x8 baking pan and set aside.
2. Heat half the olive oil in a large frying pan over medium. While the pan is heating up, cut onion in half and slice in thin half rounds. Add sliced onions and stir to coat with oil. Cook for five minutes to soften.
3. While the onions cook, peel potatoes and thinly slice to approximately 1/8 inch thick. Add the rest of the olive oil and the potatoes to the pan. Cook another 10 minutes, stirring occasionally, until the potatoes have started to soften. Once the onions and potatoes are done, set aside to cool slightly.
4. In a large bowl, mix egg whites, egg, half and half, cheese, and salt. Whisk to combine, then mix in potatoes and onions. Pour into the prepared baking pan.
5. Bake for 40 minutes or until set in the center.
Note: This recipe is very flexible in terms of adding more vegetables. My preferences are diced red bell pepper, scallions, or spinach (chopped and wilted before being added to the egg mixture).

-
Recipe of the Week
Moroccan Style ChickenThis week’s PRS Power Recipe is brought to you by PRS resident foodie Miriam Lazewatsky!
If you make the recipe below please share it on social media using the PRS hashtag (#prorehabstrength) and tag Miriam (@liftsatnight) and PRS (@prorehabstrength) and let us know how you like it!
(Adapted from Skinnytaste) There are dozens, if not hundreds, of Moroccan chicken (tagine) recipes out there using different types of mixed fruit, with or without tomato, and with various spice blends. While this is another dish I grew up eating, my mom tends not to follow written recipes all that closely, so replicating her recipe is a challenge. To make my version, I started with the Skinnytaste recipe and adjusted for the ingredients I’m used to.
Slow Cooker Moroccan-Style Chicken
Makes 5 servings
Nutrition Information: 262 calories, 6 grams fat, 26 grams carbs, 27 grams protein
Ingredients:
· 1 cup chicken bone broth
· 8 oz can tomato sauce or diced tomatoes
· 2 tsp Ras el Hanout (see notes)
· 1/2 tsp cumin
· 1/2 tsp sweet paprika
· 1/2 tsp cinnamon
· 1/2 tsp ground coriander
· 1 tsp turmeric
· 1 tbsp minced garlic (2-3 cloves)
· 1 tbsp grated ginger (about 1 inch, whole)
· 1 large yellow onion, diced
· 4 medium carrots, peeled and large diced
· 55 grams green olives, cut in quarters
· 45 grams raisins, preferably golden
· 1.25 lbs boneless skinless chicken thighs
· 1 cup parsley
Directions:
1. Place all ingredients except chicken thighs and parsley in a slow cooker and stir to mix. Add chicken thighs so they aren’t overlapping and nestle into the mixture so they’re covered by liquid.
2. Cook on high for 3.5-4 hours or until the chicken reaches an internal temperature of 165F. Stir in parsley.
3. Serve over couscous (or quinoa for a gluten free option).
Note: Ras el hanout is a spice used across North Africa. The specific spices differ from place to place, but generally include a combination of sweet and savory flavors, such as cardamom, cinnamon, and nutmeg along with cumin, mace, coriander, and paprika. If you don’t have ras el hanout in your spice rack, you can either increase the other spices, or Google a recipe and make your own blend!
-
Recipe of the Week
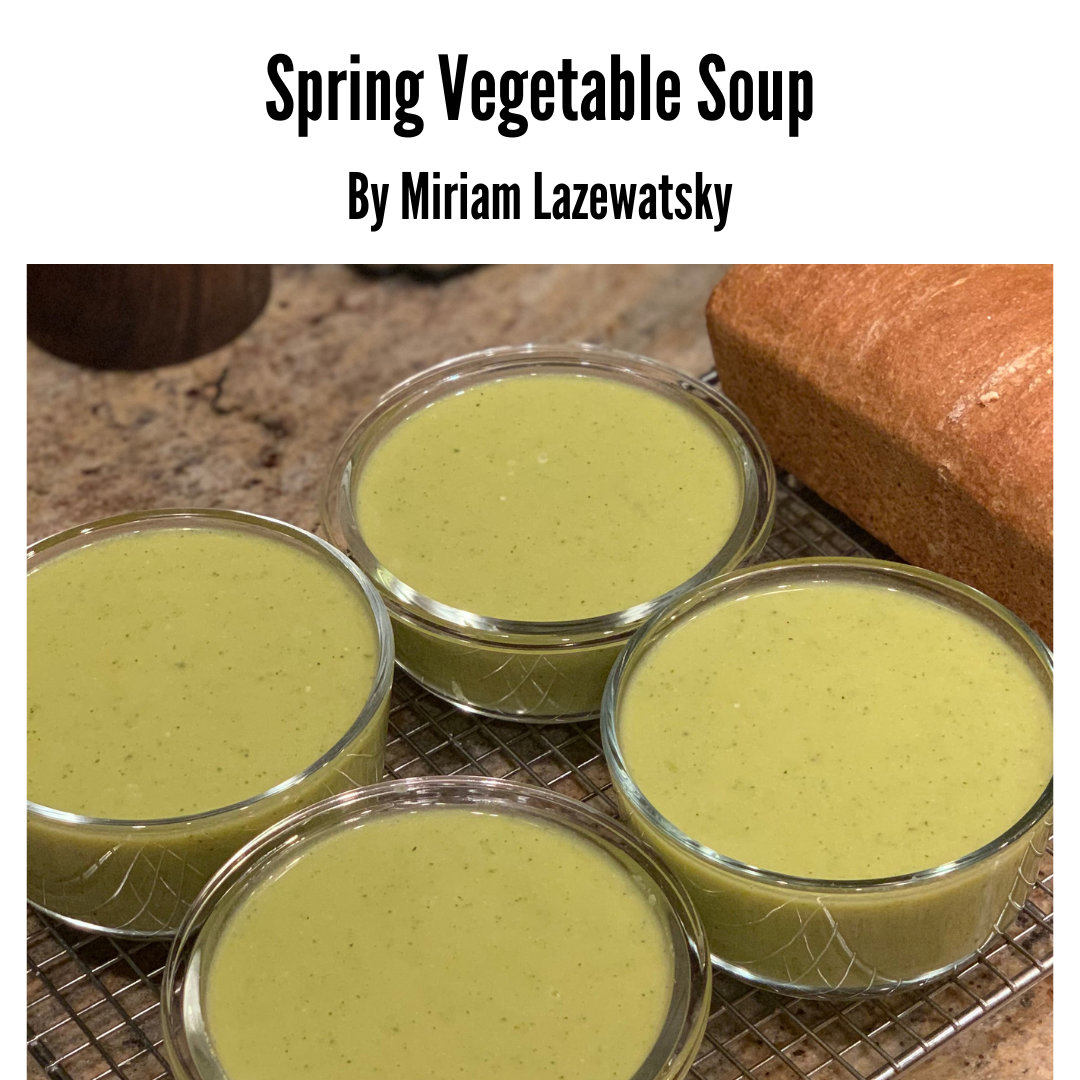
Spring Vegetable SoupThis week’s PRS Power Recipe is brought to you by PRS resident foodie Miriam Lazewatsky!
If you’re not a PRS client with access to our recipe archive, be sure to print or screenshot this recipe to save it.
If you make the recipe below please share it on social media using the PRS hashtag (#prorehabstrength) and tag Miriam (@liftsatnight) and PRS (@prorehabstrength) and let us know how you like it!
Adapted from Chelsea J Young. This soup is perfect as a side or as the main focus of a light meal. The main ingredients are zucchini and asparagus, but it’s easy to add other mild vegetables, like the cauliflower I’ve included. This recipe gets a surprising amount of protein from a combination of chicken bone broth and parmesan cheese.
Spring Vegetable Soup
Makes 4 servings
Nutrition Information: 170 calories, 7 grams fat, 12 grams carbs, 17 grams protein
Ingredients:
· 1 tbsp olive oil
· 1 large onion, diced
· 3 cloves garlic, minced (approximately 1 tbsp if using preminced)
· 4 cups chicken bone broth
· 1 large zucchini
· 1 large bunch asparagus
· 1 cup cauliflower florets
· 40 g parmesan cheese, grated (approximately ¼ cup)
Directions:
1. In a Dutch oven, heat the olive oil over medium-high. Add onion and garlic. Cook until onion starts to become translucent, about 5-7 minutes.
2. Meanwhile, chop the zucchini into 1 inch pieces. Snap off the ends of the asparagus and cut into 2 inch pieces.
3. When the onion is cooked, add the bone broth, zucchini, asparagus, and cauliflower to the pot. Bring to a boil, then reduce heat and cook until vegetables are cooked through.
4. Add salt and pepper to taste and allow soup to cool for 15-20 minutes.
5. Add parmesan and stir to combine. Using an immersion blender, blend the soup until smooth. If you don’t have an immersion blender, blend in a standard blender, in batches if needed.

-
Recipe of the Week
Chinese Takeout Style Chicken & BroccoliThis PRS Power Recipe is brought to you by PRS resident foodie Miriam Lazewatsky!
If you make the recipe below please share it on social media using the PRS hashtag (#prorehabstrength) and tag Miriam (@liftsatnight) and PRS (@prorehabstrength) and let us know how you like it!
Adapted from Omnivore’s Cookbook. I love Chinese takeout. There are some dishes I can’t easily make at home, but simpler ones, like this one, are great for meal prep. I double the sauce from the original recipe because I add more vegetables than are originally called for.
Chinese Takeout Style Chicken & Broccoli
Makes 4 servings
Nutrition Information: 335 calories, 10 grams fat, 34 grams carbs, 29 grams protein
Ingredients:
Chicken and Marinade:
· 1 lb. boneless skinless chicken breast, raw (approx. 2 large)
· 1 tbsp Shaoxing (Chinese rice wine) – See notes
· ½ tsp salt
· 1 tbsp cornstarch
Sauce:
· ¼ cup + 2 tbsp tbsp oyster sauce
· ¼ cup Shaoxing
· ½ cup chicken bone broth (or regular chicken broth)
· 2 tbsp dark soy sauce – See notes
· 2 tbsp granulated sugar
· 2-3 tbsp cornstarch
Everything Else:
· 1 bag broccoli florets
· 1 tbsp minced ginger
· 1 tbsp minced garlic
· 2 tbsp neutral oil (I use peanut), divided
Directions:
1. Slice the chicken against the grain into pieces no more than ¼ inch thick. Transfer to a medium bowl and add the marinade ingredients. Use your hand to mix, ensuring that the chicken is evenly coated. Set aside and let marinate for at least 10 minutes.
2. Mix all ingredients for the sauce except cornstarch. Mix cornstarch with equal amount of water and whisk until fully blended. Set both aside.
3. In a wok or large, deep pan, bring about 3 inches of water to a boil. Add the broccoli and cook for 30 seconds to one minute. Drain and rinse with cold water to keep it from continuing to cook. Set aside.
4. Return pan to stove and wipe down any water that hasn’t evaporated using a paper towel and a pair of tongs. Then, heat 1 tbsp of oil over high heat. Once it is very hot, add chicken and cook approximately 3-4 minutes per side, or until cooked through. Remove from pan and set aside.
5. Turn the burner down to medium high and add the remaining oil to the pan. When the oil is hot, add the garlic and ginger. Cook for 30 seconds to release the flavor, then add the sauce, using the liquid to scrape down the pan for any bits of chicken, ginger, or garlic that have stuck to it. Once the sauce comes to a boil, quickly remix the cornstarch mixture (it will start to separate as it sits) and slowly drizzle it into the sauce while stirring, which ensures the cornstarch doesn’t clump. Turn heat to low and cook another 30 seconds to let the sauce thicken.
6. Add chicken and broccoli and toss to coat with the sauce. Serve over rice, noodles, or whatever you like!
Notes:
· Shaoxing is Chinese rice wine and is available in most Chinese grocery stores or online. This can also be replaced with dry sherry.
· Dark soy sauce darker, sweeter, and slightly saltier than regular, or light, soy sauce. It also gives dishes like this one their characteristic darker color. Like Shaoxing, it is available at Chinese grocery stores or online, but can be replaced with the standard lighter soy sauce most people already have in their fridge. You can also use tamari for a gluten free alternative.
· Oyster sauce is typically not gluten free but there are gluten free options on the market. There are, also gluten free recipes available online.
-
Recipe of the Week
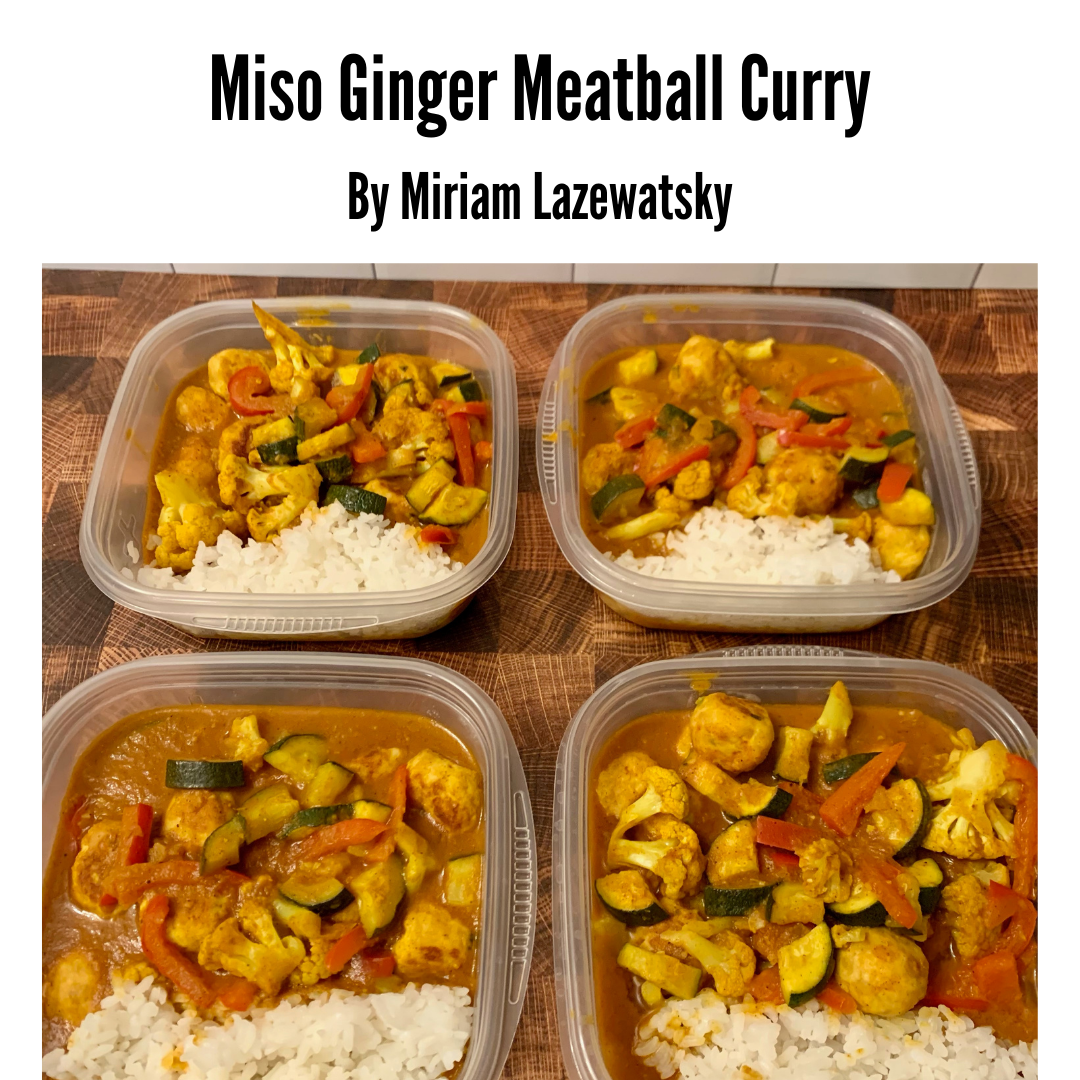
Miso Ginger Meatball CurryThis week’s PRS Power Recipe is brought to you by PRS resident foodie Miriam Lazewatsky!
If you’re not a PRS client with access to our recipe archive, be sure to print or screenshot this recipe to save it.
If you make the recipe below please share it on social media using the PRS hashtag (#prorehabstrength) and tag Miriam (@liftsatnight) and PRS (@prorehabstrength) and let us know how you like it!
Adapted from WorkWeekLunch. Curry is the only way I’ll eat coconut. For years, I avoided making it at home because I wasn’t sure I’d like the flavor, but coconut milk, even the lighter version I use here, adds richness to the sauce without the obvious flavor I dislike. This recipe is hearty and filling without being heavy, and is packed with plenty of vegetables in addition to a good serving of protein. It’s also perfect for meal prep because it reheats beautifully.
Miso Ginger Meatball Curry
Makes 4 servings
Nutrition Information: 460 calories, 25 grams fat, 26 grams carbs, 32 grams protein
For the Meatballs:
· 1 large egg, beaten
· ½ cup panko breadcrumbs, gluten free if needed
· 1 Tbsp soy sauce, sub liquid aminos or tamari for gluten free
· 3 scallions, green and white ends chopped, about 1/4 cup
· 1 tsp sesame oil
· 2 tsp minced garlic, about 2 cloves
· 2 tsp miso paste, any color is fine, but I like sweet light
· 1 tsp rice vinegar
· 1 tsp salt
· 1 Tbsp olive oil
· 16 oz ground chicken
For the Curry:
· 2 Tbsp miso paste
· 2 Tbsp grated fresh ginger, sub 1 tsp ground ginger
· 1 Tbsp minced garlic, about 3 cloves
· ½ yellow onion, diced
· 2 tsp curry powder
· 1 tsp garam masala
· 1 tsp turmeric
· ½ tsp salt
· 1 tsp olive oil
· 15 oz canned lite coconut milk
· 8 oz can tomato sauce
· ½ cup vegetable or chicken broth (water works fine)
· 1 red bell pepper, cut into slices
· 2 zucchini, cut into thick quarter rounds
· 1 head cauliflower, chopped into bite-sized pieces
Directions:
1. Preheat oven to 375F.
2. In a large bowl, combine all ingredients for meatballs until fully blended. Form 2 Tbsp balls (I like to use a small cookie scoop for this) and place on a greased baking sheet. If the mixture sticks to your hands too much to form the balls, wet down your hands occasionally, which will help. Try to be gentle when shaping the meatballs; if you compress them too much, they can become tough.
3. Bake meatballs for 15-20 minutes, or until a meat thermometer reads 165F. When done, remove from oven and set aside.
4. While the meatballs are cooking, make the curry paste. In a small food processor or blender, add the miso paste, ginger, garlic, onion, curry powder, garam masala, turmeric, and salt. Process until a paste forms. Scrape down the sides a few times to make sure everything is blended evenly.
5. Heat a Dutch oven over medium-high for a few minutes, then add olive oil and swirl to coat. Add curry paste and fry for about a minute. Add coconut milk, tomato sauce, and broth. Stir to mix and allow to simmer for 10 minutes.
6. Add vegetables and stir to coat. Cover the Dutch oven and simmer for another 10-15 minutes, or until the cauliflower is fork-tender.
7. Add the meatballs to the sauce and stir to coat.
8. Serve over rice.
-
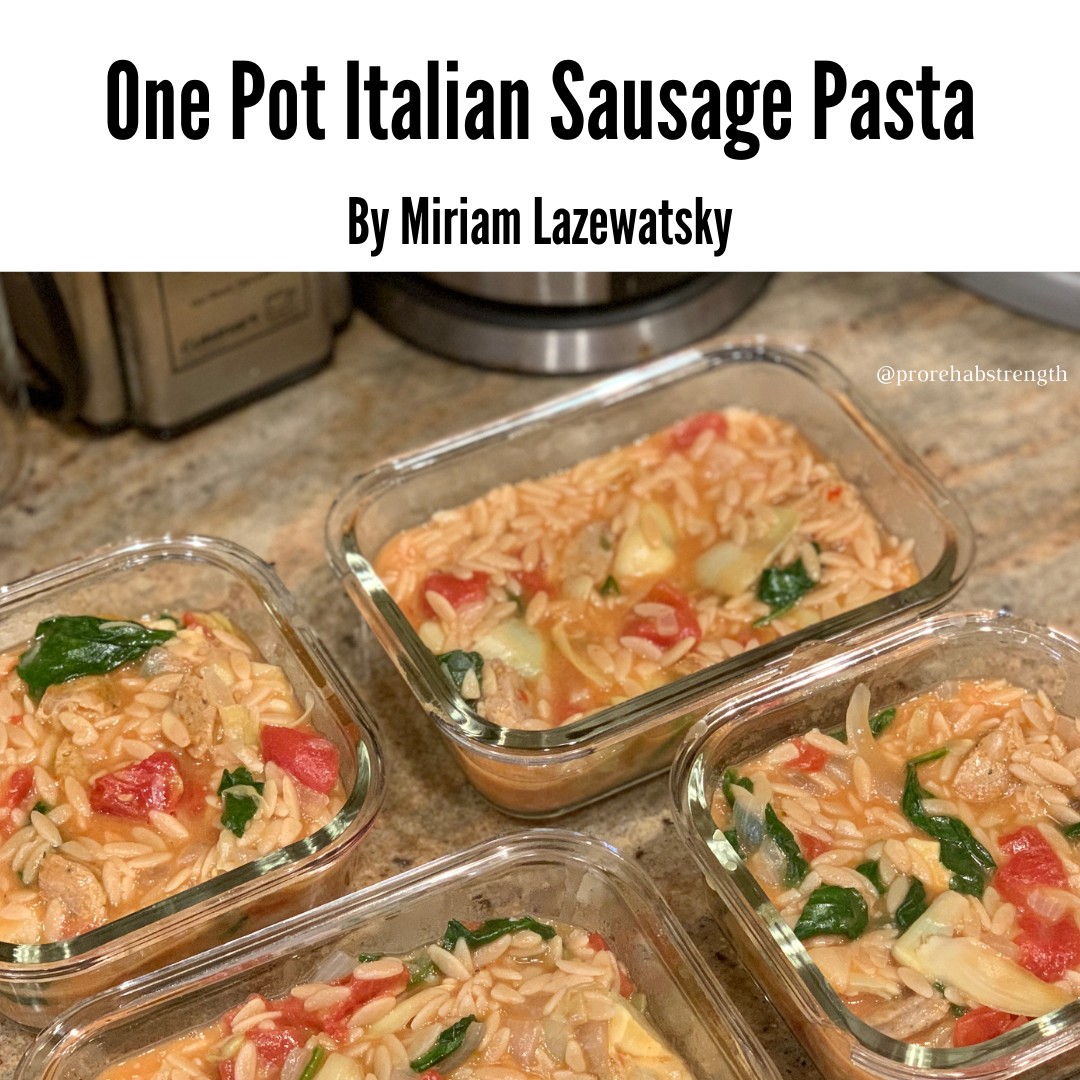
Recipe of the Week
One Pot Italian Sausage PastaThis week’s PRS Power Recipe is brought to you by PRS resident foodie Miriam Lazewatsky!
If you make the recipe below please share it on social media using the PRS hashtag (#prorehabstrength) and tag Miriam (@liftsatnight) and PRS (@prorehabstrength) and let us know how you like it!
Adapted from the Kitchn, I found this recipe several years ago when I first started meal prepping. It quickly became a staple because it’s easy to adapt and reheats well. I’ve frequently made it using whole wheat orzo, but recently started using Banza pasta for a bit of extra protein and much more fiber. Any shape works, but I’d recommend something smaller, like rotini or penne, over linguine or spaghetti.
One Pot Italian Sausage Pasta
Makes 4 servings
Nutrition Information: 420 calories, 14 grams fat, 46 grams carbs, 32 grams protein
Ingredients:
· 1/2 medium yellow onion, diced
· 2 links sweet Italian turkey sausage (I use Shadybrook Farms)
· 1 Tbsp olive oil
· 2 cups chicken bone broth
· 14 oz can fire roasted diced tomatoes (do not drain)
· 1 can quartered artichoke hearts, drained
· 8 oz Banza pasta, dry
· 30 g pecorino romano cheese, grated
· 5 oz bag baby spinach
Directions:
1. Heat half the olive oil in a large frying pan over medium. Add sausage (removed from casing) and cook, breaking into small to medium pieces. Once cooked, set aside.
2. Heat the rest of the oil in a Dutch oven. Add onions and cook until they just start to soften, about five minutes, then add broth, tomatoes, and artichoke hearts and bring to a boil.
3. Add pasta, cover, and reduce heat. Simmer until pasta is cooked, approximately 7-9 minutes.
4. Once the pasta is cooked, remove from the heat. Stir in pecorino romano and cooked sausage, then add spinach and stir to wilt.
-
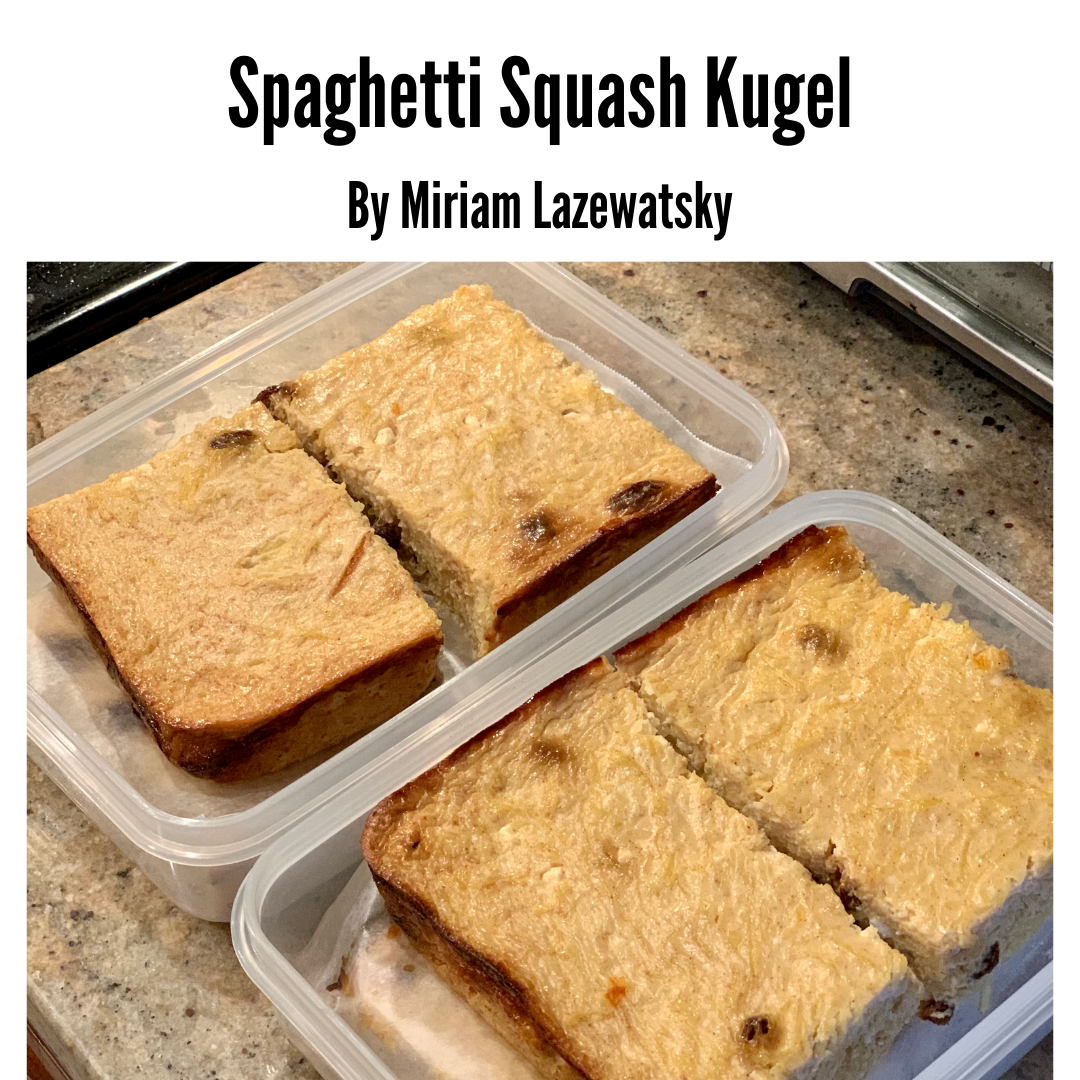
Recipe of the Week
Spaghetti Squash KugelThis week’s PRS Power Recipe is brought to you by PRS resident foodie Miriam Lazewatsky!
If you make the recipe below please share it on social media using the PRS hashtag (#prorehabstrength) and tag Miriam (@liftsatnight) and PRS (@prorehabstrength) and let us know how you like it!
Adapted from Smitten Kitchen! Deb Perelman of Smitten Kitchen posted this recipe as a one-off in her Instagram stories and I immediately knew I had to try it. The protein isn’t as high as many of my recipes, but for a snack or even dessert, this is a great option that’s not too sweet and still delicious. Eat it warmed up slightly, room temperature, or even straight from the fridge (which is what my husband does).
Spaghetti Squash Kugel
Makes 8 servings
Nutrition Information: 150 calories, 3 grams fat, 23 grams carbs, 9 grams protein
Ingredients:
· 1 large spaghetti squash (will yield approximately 5 cups)
· ¾ cup 1% small curd cottage cheese
· ¾ cup 2% Greek yogurt
· ¼ cup granulated sugar
· 2 tsp cinnamon
· 3 large eggs
· 1.5 oz raisins
Directions:
1. Preheat oven to 400F. Cut the stem end off the spaghetti squash and then split lengthwise. Use a spoon to scoop out and discard the seeds. Spray a baking sheet with nonstick spray and place the spaghetti squash halves facedown. Cook for 30-40 minutes or until the spaghetti squash is slightly soft when pressed. Remove from oven and allow to cool until cool enough to touch without an oven mitt, at least 15 minutes. Once spaghetti squash is cool, use a fork to scrape the strands off the peel.
2. Turn oven down to 350F (or preheat, if baking the day after preparing the spaghetti squash). Spray a 9x13 roasting pan with nonstick spray. Set aside.
3. Mix cottage cheese, yogurt, sugar, cinnamon, and eggs in a large bowl. Stir in spaghetti squash, then raisins. Pour into prepared baking pan.
4. Bake for 50-75 minutes, or until set. If you find that the top is browning too quickly and are near the end of the baking time, remove from the oven and cover with tin foil for another half hour.
Notes:
· I’ve found that most spaghetti squash yield 4-6 cups of strands. Any amount in this range will work.
· Spaghetti squash can be roasted and scraped the night before and kept in the fridge overnight, which ensures it has fully cooled before being added to the rest of the ingredients.
-
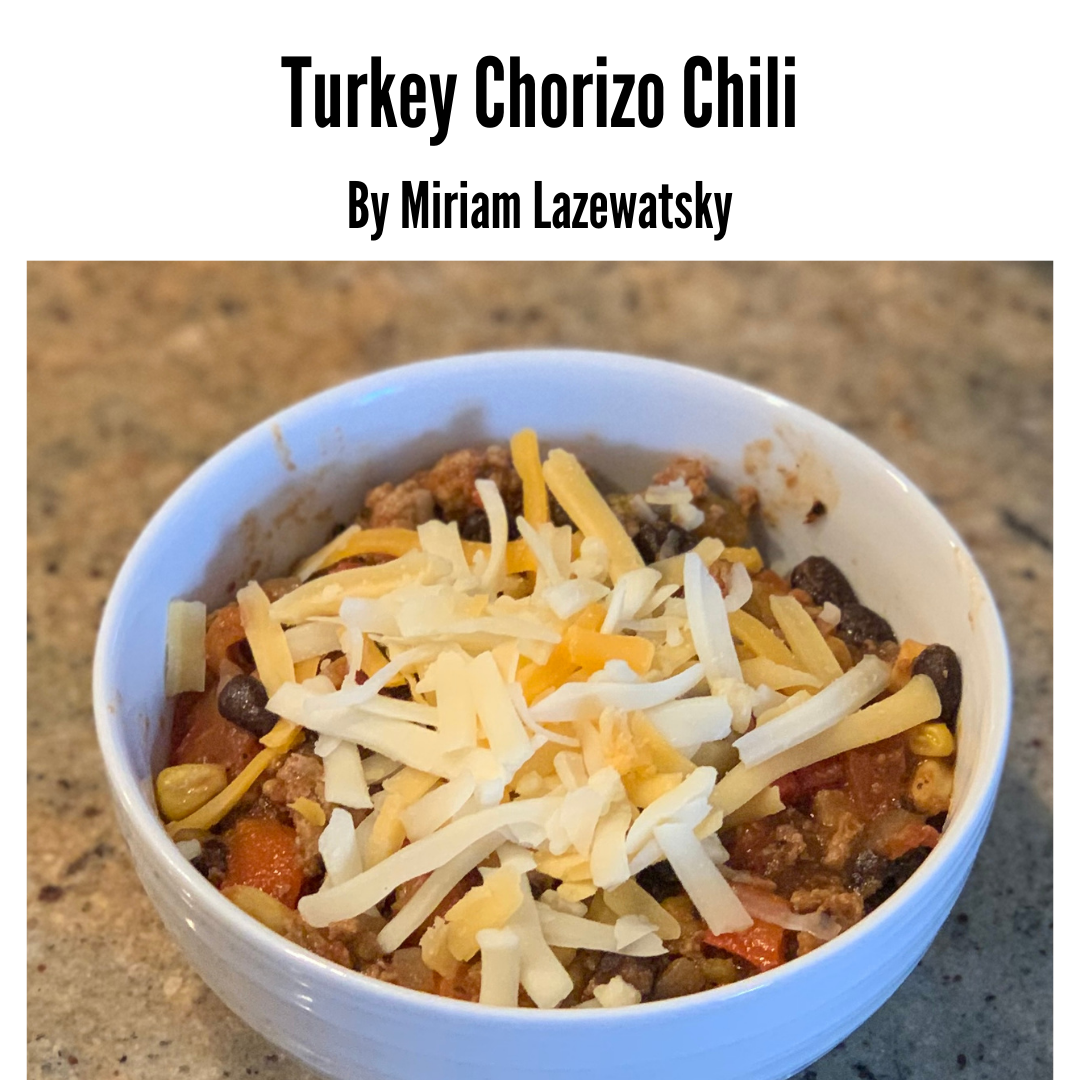
Recipe of the Week
Turkey Chorizo ChiliThis PRS Power Recipe is brought to you by PRS resident foodie Miriam Lazewatsky!
If you make the recipe below please share it on social media using the PRS hashtag (#prorehabstrength) and tag Miriam (@liftsatnight) and PRS (@prorehabstrength) and let us know how you like it!
Adapted from Workweek Lunch! This is my take on chili con carne, which is a perfect hearty dish for the middle of winter. Texans may prefer all meat chili, but I like mine to have some beans and vegetables to make it feel like a more complete meal. Swapping the traditional beef out for turkey keeps the fat a bit lower and black beans add some fiber. The chorizo flavoring gives just a hint of smokiness and hatch chiles, though not traditional, are flavorful without being overly spicy. One of my favorite things about chili is that the flavors meld and deepen over time, making it perfect for meal prep.
Turkey Chorizo Chili
Makes 4 servings
Nutrition Information: 530 calories, 19 grams fat, 54 grams carbs, 35 grams proteinIngredients:
· 1 tbsp olive oil
· 1 large red onion, diced
· 1 lb. 93% lean ground turkey
· 1 packet Old El Paso Chorizo Taco seasoning mix
· 1 tbsp tomato paste
· 1.5 tsp chili powder
· 1 tsp minced garlic (about one clove)
· 3 scallions, sliced thin, white and green parts separated
· 15 oz can fire roasted diced tomatoes (do not drain)
· 1 red bell pepper, diced
· 4 oz can diced hatch green chiles
· 15 oz can sweet corn kernels
· 15 oz can black beans
· 1 tsp sweet paprika (use smoked or hot if you prefer those flavors)
· 1 tsp dried oregano
· 1 tsp ground cumin
· 4 oz. 2% reduced fat Mexican blend shredded cheese
Directions:
1. Heat a Dutch oven or large pot over medium heat. Add olive oil, then diced onion. Sauté onion until slightly translucent, about 5 minutes.
2. Add turkey, Chorizo Taco seasoning, chili powder, and tomato paste. Stir well to ensure the ingredients mix evenly and turkey is broken up into smaller pieces. Continue cooking until cooked through, 5-8 minutes.
3. Add white ends of scallions, diced tomatoes, black beans, corn, chiles, paprika, oregano, and cumin, along with a cup of water. Stir well, then turn heat up to high and bring to a boil. Reduce heat to low, cover, and allow to simmer for at least 15-20 minutes, up to an hour.
4. Serve with 1 oz. shredded cheese and sliced green scallions.
-
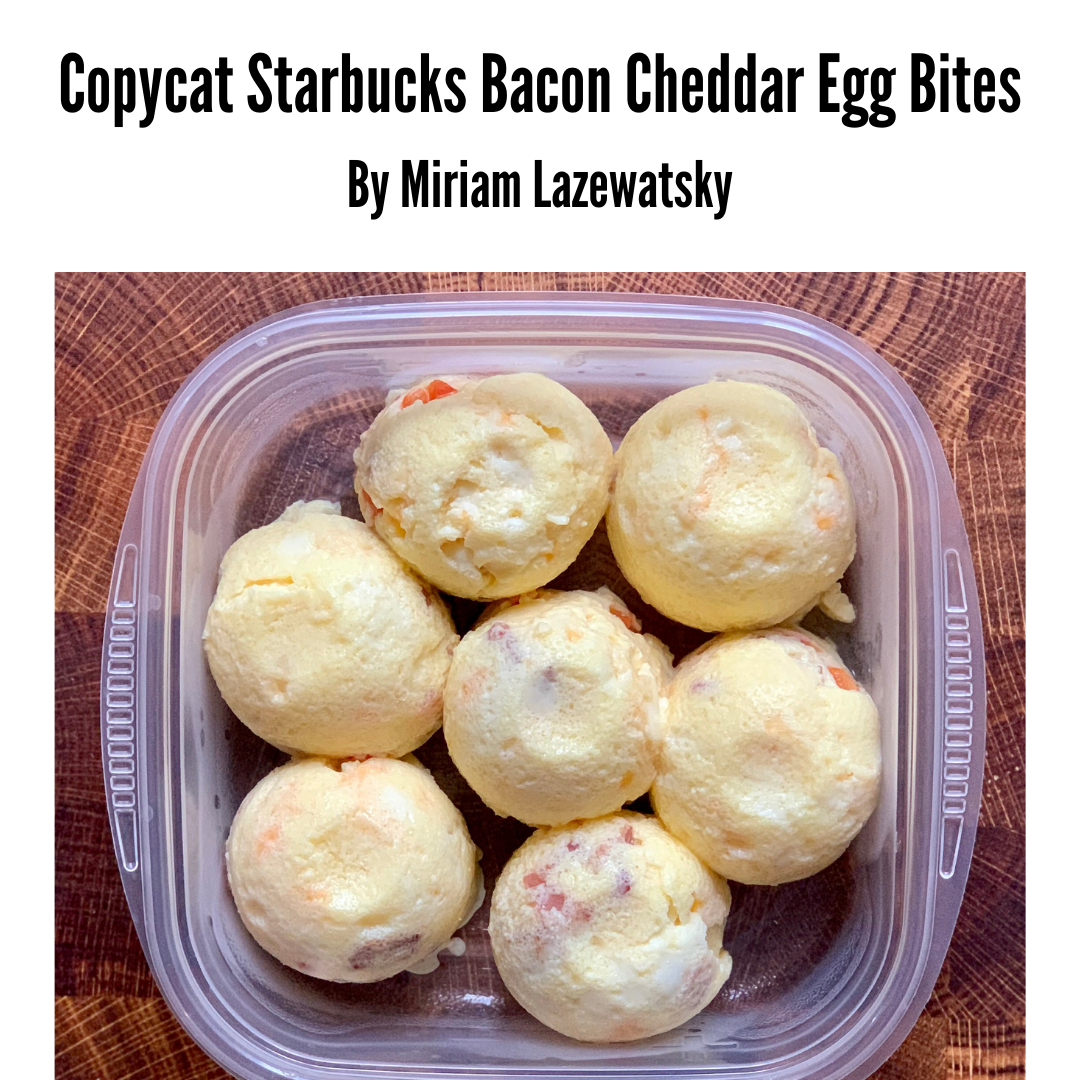
Recipe of the Week
Copycat Bacon Cheddar Egg BitesThis week’s PRS Power Recipe is brought to you by PRS resident foodie Miriam Lazewatsky!
If you’re not a PRS client with access to our recipe archive, be sure to print or screenshot this recipe to save it.
If you make the recipe below please share it on social media using the PRS hashtag (#prorehabstrength) and tag Miriam (@liftsatnight) and PRS (@prorehabstrength) and let us know how you like it!
Starbucks sous vide egg bites used to be my favorite quick snack when I needed some protein and hadn’t brought any food with me. In the past year, I haven’t been to Starbucks as much as usual, but I still like having these in the fridge for a snack or light meal. They reheat in 30 seconds in the microwave and last at least 4 days in the fridge. I haven’t tried it, but they’re probably freezer-friendly, too. I make these in a silicone egg bite mold, which is available on Amazon and is pretty inexpensive. If you don’t have an air fryer, these can be baked in an oven, as well.
Copycat Starbucks Bacon Cheddar Egg Bites
Makes 7 egg bites
Nutrition Information for bacon cheddar: 88 calories, 5 grams fat, 2 grams carbs, 8 grams protein
Ingredients:
· 2 eggs
· 1/2 cup egg whites
· 1/4 cup reduced fat cottage cheese
· 1/4 cup 1% milk
· 1/4 tsp salt
· 1/2 cup shredded 2% cheddar or Mexican blend cheese
· 3 strips of bacon, cooked and chopped
· 1/2 red pepper, small diced
Directions:
1. Use a blender to blend eggs, egg whites, cottage cheese, milk, and salt. This ensures the cottage cheese is fully blended.
2. Lightly spray a silicone egg bite mold and fill halfway with egg mixture. Evenly divide the add-ins you’re using among the cups, making sure the cups don’t overflow.
3. If the mold you have comes with a silicone lid like mine do, use that to cover. Otherwise, use aluminum foil.
4. Place a silicone trivet in the bottom of your pressure cooker and add one cup of water. If your egg bite mold comes with a sling, you can use that instead of the trivet.
5. Add your filled, covered egg mold to the pressure cooker. If using more than one, it’s fine to stack them, but turn the top mold half a turn, so the cups are not stacked directly on top of each other.
6. Place lid on pressure cooker and leave vented. Set to steam and cook for 12 minutes.
7. Remove from the pressure cooker and cool for at least five minutes before removing.
Note:
I have a Ninja Foodi, so these directions are tailored to that, but there are lots of recipes online that use an Instant Pot and the recipe should be easy to adapt.
-
Recipe of the Week
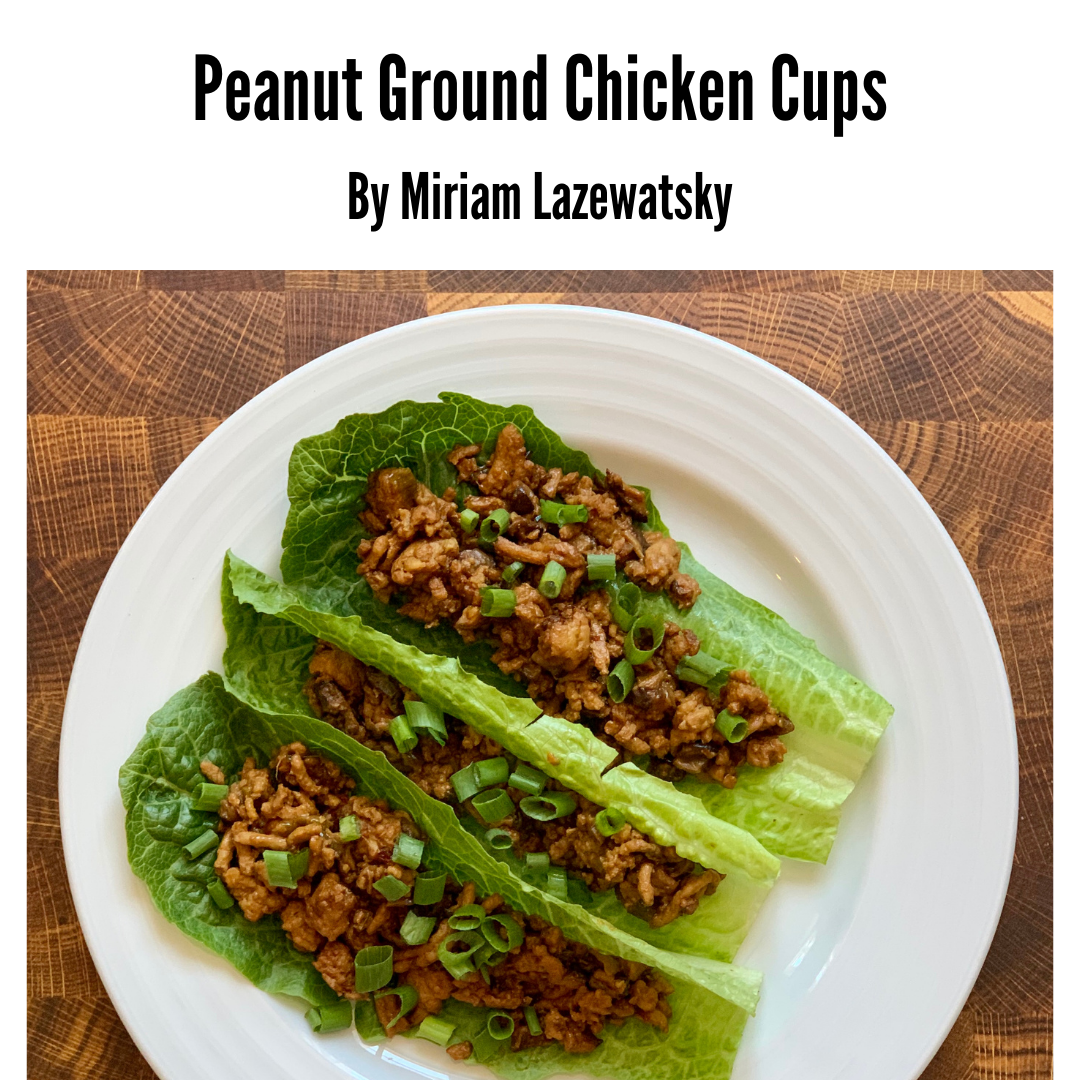
Peanut Ground Chicken CupsThis PRS Power Recipe is brought to you by PRS resident foodie Miriam Lazewatsky!
If you’re not a PRS client with access to our recipe archive, be sure to print or screenshot this recipe to save it.
If you make the recipe below please share it on social media using the PRS hashtag (#prorehabstrength) and tag Miriam (@liftsatnight) and PRS (@prorehabstrength) and let us know how you like it!
Adapted from WorkWeekLunch. If you love the chicken cup appetizer from PF Chang’s, you’ll love these. This recipe came to be because I realized too late that some of the ingredients in the original recipe were not kosher for Passover. I find these filling on their own, but if you want more carbs, these would be delicious with the addition of rice.
Chicken Peanut Cups
Makes 3 servings
Nutrition Information: 380 calories, 23 grams fat, 18 grams carbs, 32 grams protein
For the Sauce:
· 2 Tbsp creamy peanut butter (see note)
· 1 Tbsp regular soy sauce
· 1 Tbsp dark soy sauce (sub regular)
· 2 tsp rice vinegar
· 1 tsp sesame oil
· 1 tsp chili garlic sauce (sub sriracha)
For the Chicken:
· 1 tsp neutral oil, like peanut or canola
· 16 oz ground chicken
· 2 clove garlic, minced (about 2 tsp)
· 1 inch ginger, minced (about 1 Tbsp)
· ½ bunch green onion, white and green ends chopped and separated
· 8 oz shiitake mushrooms, stems removed and diced (sub white mushrooms)
· 1 carrot, grated (about ½ cup)
· Romaine or butter lettuce leaves, to serve
Directions:
1. In a mason jar, add all ingredients for the sauce and shake to blend. You may need to use a fork or a small whisk to get the peanut butter started. Set aside.
2. Heat the oil in a large nonstick pan over medium high for a couple minutes. Add the chicken, garlic, ginger, and white ends of the green onions. Cook until chicken is cooked through and no pink remains.
3. Add mushrooms to the pan and stir to combine. Cook, stirring occasionally, another 5-8 minutes or until the mushrooms have cooked down and very little of the moisture remains.
4. Turn heat down to medium and add sauce and carrots. Stir to coat and cook another 2-3 minutes, or longer if there is still too much liquid in the pan.
5. To serve, divide each portion among lettuce leaves and top with chopped green ends of the green onions. I found each serving used 3-4 lettuce leaves.
Note: If you are allergic to peanuts, sub another nut butter like almond or cashew, or even sunflower seed butter. If you are looking to cut down on fat, this recipe originally called for hoisin sauce in place of peanut butter, which I’m sure is delicious. Oyster sauce could also work as a substitute.
-
Recipe of the Week
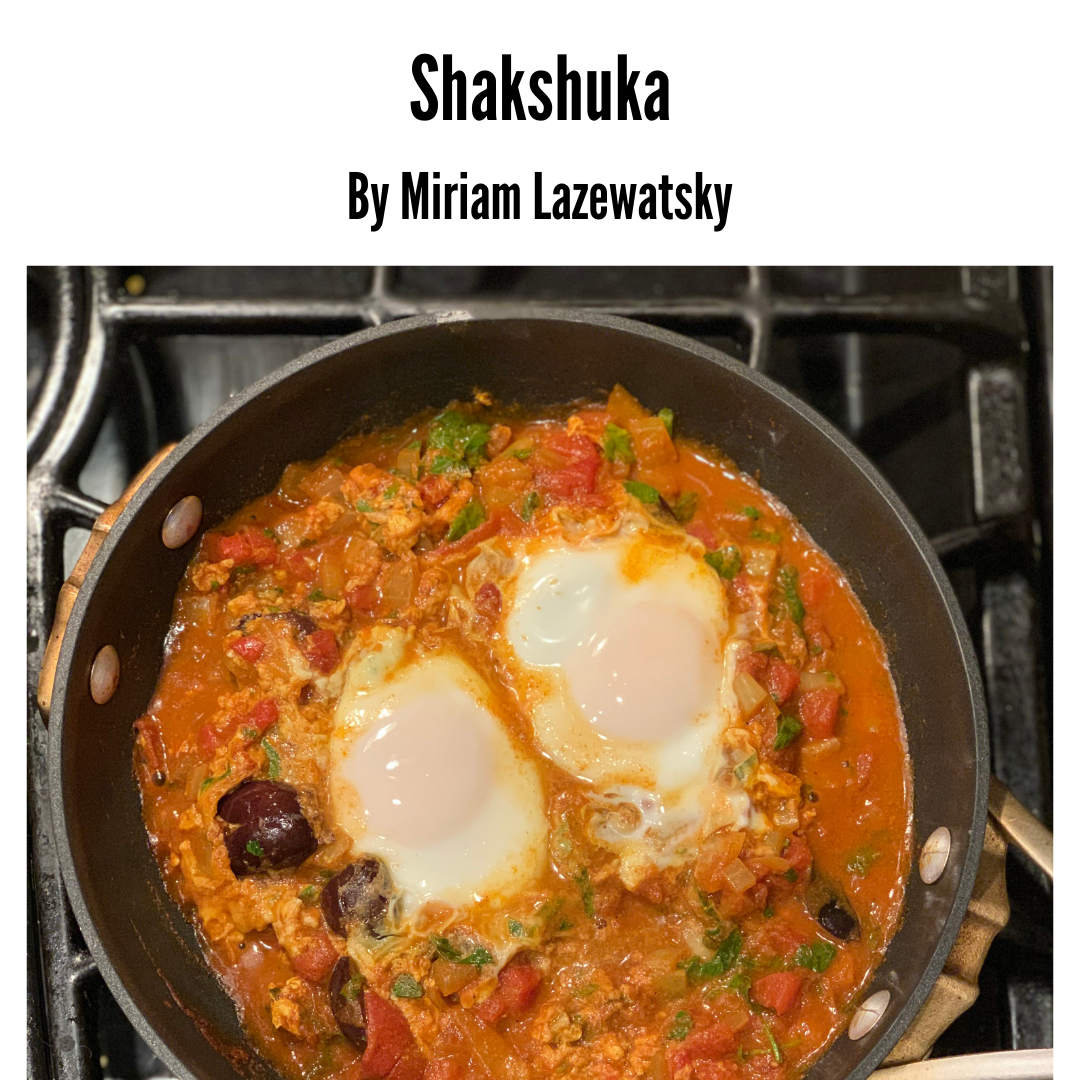
ShakshukaThis PRS Power Recipe is brought to you by PRS resident foodie Miriam Lazewatsky!
If you make the recipe below please share it on social media using the PRS hashtag (#prorehabstrength) and tag Miriam (@liftsatnight) and PRS (@prorehabstrength) and let us know how you like it!
Adapted from WorkWeekLunch. Shakshuka is a North African and Middle Eastern dish made from tomatoes, onions, and spices eaten with poached eggs. Many people add other ingredients, as well, such as feta cheese, or olives, which I’ve included here. Shakshuka is highly customizable and is vegetarian and gluten free. It meal preps well (I make the base for meal prep and cook the eggs when I’m ready to eat) but is also a quick meal to make from scratch.
Shakshuka
Makes 3 servings
Nutrition Information: 250 calories, 16 grams fat, 14 grams carbs, 14 grams protein
Ingredients:
· 1 tsp olive oil
· ½ yellow onion, diced
· 15 oz. can diced tomatoes (do not drain)
· 45 grams kalamata olives, chopped
· Salt and pepper, I used about 1 tsp
· 2 tsp sweet paprika
· 2 tsp cumin
· 2 tsp cinnamon
· 2 tsp turmeric
· 1 cup fresh parsley, chopped
· 6 eggs
Directions:
1. Heat olive oil in a large skillet over medium. Add onions and cook about five minutes, until just starting to soften.
2. Add tomatoes, olives, salt, and spices. If you like spice, this is a good time to add a bit of sriracha or your favorite hot sauce! Stir to mix.
3. Bring to a boil and stir in parsley, then reduce heat to a simmer and cook for five minutes. If you’re making this for meal prep, turn off the heat now, let cool, and then portion into three containers.
4. To finish, heat over medium to a simmer. Add two eggs per serving, cover, and let cook until eggs are done to your preference, 5-8 minutes.
-
Recipe of the Week
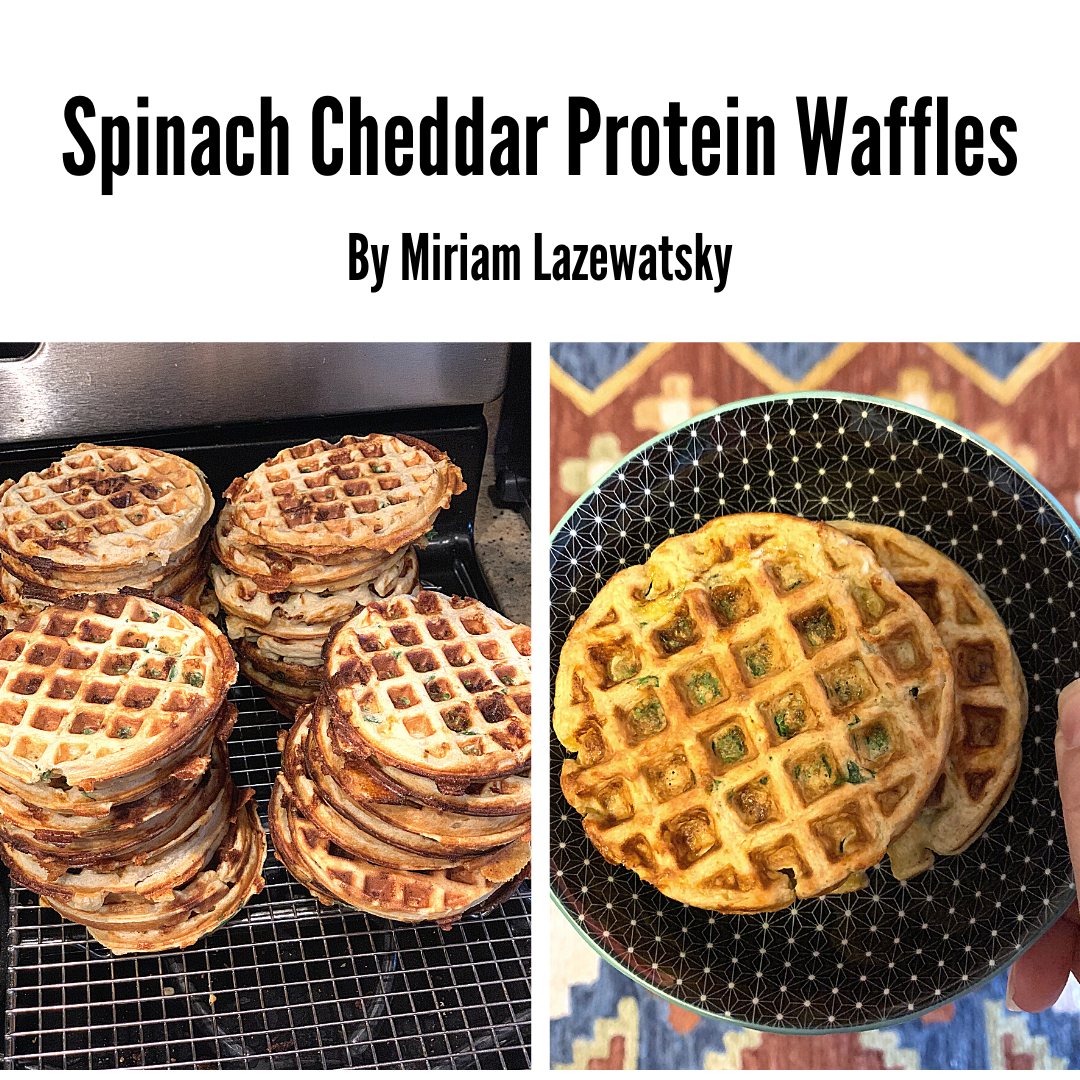
Spinach Cheddar Protein Waffles
This PRS Power Recipe is brought to you by PRS programming and nutrition client, Miriam Lazewatsky, who is our resident foodie and crushes her weekly meal prep.
If you make the recipe below please share it on social media using the PRS hashtag (#prorehabstrength) and tag Miriam (@liftsatnight) and PRS (@prorehabstrength) and let us know how you like it!
From The Foodie: I grew up eating Van’s waffles every morning for breakfast as I was running out of the house to catch the bus to school. They’re still my go-to easy breakfast. Because they freeze well, I can make a huge batch and have breakfast ready all month, and three waffles have close to 30 grams of protein! The combination of spinach and cheddar is a classic, while the onion powder boosts the flavor by bringing a savory kick to the batter.
Spinach Cheddar Protein Waffles
Makes: 36 toaster waffles
Nutrition Information per waffle: 100 calories, 3 fat, 10 carbs, 9 protein
This recipe is adapted from Cheat Day Design and Workweek Lunch.
Dry Ingredients:
230 grams (2 cups + 1 Tbsp.) White Whole Wheat Flour
110 grams (3/4 cup + 1 Tbsp.) Oat Flour
30 grams (2/3 cup) Vital Wheat Gluten
20 grams Baking powder
50 grams Unflavored Whey Isolate
6 Tbsp. + 1 tsp. Buttermilk Powder (See note 1)
1 tsp. Salt
1 Tbsp. Onion powder
Wet Ingredients:
2.5 cups Milk (See note 2)
4 cups Sharp Cheddar, shredded (See note 3)
5 oz. Package baby spinach, chopped
Directions:
Turn waffle iron on to preheat while prepping the batter.
Mix all dry ingredients in a large bowl. This can be done well ahead of time to be pulled out when you want to cook.
Add milk and whisk until completely blended. Fold in cheese and spinach.
Spray waffle maker with nonstick spray or atomized oil. Use a quarter cup measure to fill each waffle cavity. Cook for approximately three minutes. Remove and allow to cool on a baking rack. Store in the fridge for 4-5 days or freeze for up to 3 months. Toast to reheat.
Notes:
Buttermilk powder is optional, but recommended, especially if you really like the flavor of buttermilk pancakes.
I used 1% cow’s milk. This recipe should work with the milk of your choice.
I used 50/50 Kraft Natural Sharp Cheddar 2% Milk Shredded Cheese and Cabot Shredded Sharp Light50.
In general, it’s best to use the weighted measurements when given for dry ingredients, as the measurements by volume are my own calculated approximations.
I use the Dash Multi Mini Waffle Maker, which results in toaster waffles approximately the same size as Van’s or Eggo waffles you can buy in the freezer section of the grocery store. My per-waffle measurement and cooking time are based on this waffle maker.
To make gluten free, use a cup for cup GF flour instead of the wheat flour and 2 tsp xanthan gum instead of vital wheat gluten. Please note that I have not tested these substitutions.
-
Recipe of the Week
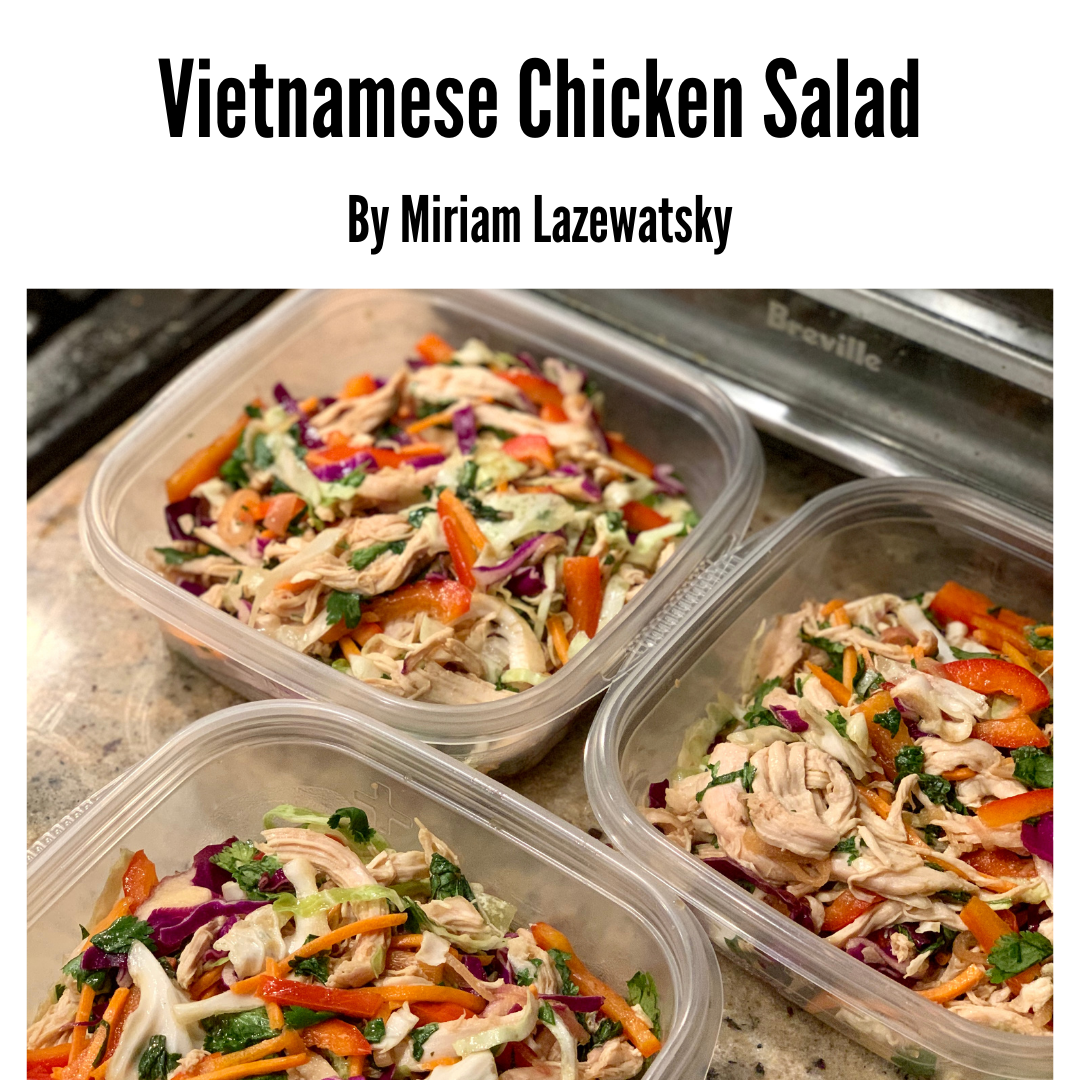
Vietnamese Chicken SaladThis PRS Power Recipe is brought to you by PRS resident foodie Miriam Lazewatsky!
If you make the recipe below please share it on social media using the PRS hashtag (#prorehabstrength) and tag Miriam (@liftsatnight) and PRS (@prorehabstrength) and let us know how you like it!
Boston has a surprisingly large Vietnamese community, and I ate a lot of Vietnamese food growing up. I have strong memories of eating at Pho Pasteur (now called Le’s) with my family as a child. Vietnamese one of my favorite cuisines; huge bowls of pho got me through grad school when money was tight and I hadn’t yet started meal prepping. This recipe is a quick and simple introduction to Vietnamese flavors.
Vietnamese Chicken Salad
Makes 3 servings
Nutrition Information: 406 calories, 18 grams fat, 25 grams carbs, 35 grams protein
Salad Ingredients:
· 1 lb. chicken breast, raw
· 2 tsp neutral oil (i.e. canola or peanut)
· 6 cups Napa cabbage, finely shredded (Note 1)
· ½ red onion, very finely sliced
· 1 bell pepper, sliced into 1-inch-long matchsticks
· 1 English cucumber, deseeded and sliced into quarter inch wide half moons
· 1 cup mint leaves, roughly chopped and tightly packed
· 1 cup cilantro leaves, tightly packed
Dressing Ingredients:
· 2 Tbsp. lime juice
· 2 Tbsp. rice vinegar
· 2 Tbsp. fish sauce (Note 3)
· 2 Tbsp. soy sauce
· 1 Tbsp. sesame oil
· 1 Tbsp. white sugar
· 1 large garlic clove, grated or very finely minced
· ¼ - ½ tsp. chili flakes (optional)
To finish:
· 45 grams peanuts, chopped
Directions:
1. Mix all dressing ingredients in a mason jar. Cover, shake to mix, and set aside to allow the flavors to meld.
2. Preheat oven to 400° F. Place chicken breasts in a rimmed baking dish and drizzle with the 2 tsp. oil. Lightly salt and use fingers to coat chicken in the oil and distribute salt evenly. Bake for 30 minutes, uncovered. Let cool for 15 minutes, then shred. I’ve found the easiest method is placing the chicken breasts in a deep bowl and using a handheld mixer, which gets them evenly shredded.
3. Place all salad ingredients, including shredded chicken, in a very large bowl. Top with dressing and mix to distribute evenly.
4. Divide into 3 containers. Top with 15 grams chopped peanuts just before serving.
Notes:
1. Can substitute with one bag pre-shredded coleslaw mix. If you go this route, let the salad sit at least half an hour before serving to let the cabbage soften.
2. If you don’t like fish sauce, this can be replaced with additional soy sauce. That said, my husband does not like fish sauce and really liked this salad with the dressing as-is. Using half soy sauce keeps the fish sauce flavor from being overwhelming. If you really like fish sauce (like me), you can use all fish sauce and no soy sauce.
© Progressive Rehab & Strength, LLC 2021